
Ghost of Tsushima trained a generation of players to think in stances. Ghost of Yotei tears that system out and replaces it with five separate weapons — Wolf Blade Katana, Dual Katana, Yari, Kusarigama, and Odachi — each with its own moveset and its own hard counter against specific enemy archetypes. Players who try to main one weapon the way they mained one stance in Tsushima will hit a wall fast. Here's how the new system actually works.
Match your weapon to the enemy, not your playstyle
The five weapons aren't just reskins with different animations — each is explicitly the strongest option against a specific opposing weapon type:
- Wolf Blade Katana — most effective against other single-katana wielders.
- Dual Katana — most effective against polearms like Yari or Naginata.
- Yari — most effective against sickle weapons like Dual Katana or Kusarigama.
- Kusarigama — most effective against shield-users.
- Odachi — most effective against brutes and heavy armored enemies.
You can carry multiple weapons at once and swap mid-combat, which means the real skill ceiling in Yotei isn't "master one weapon" — it's identifying enemy loadouts on sight and switching before the fight starts, especially in mixed encounters where the game throws several enemy types at you simultaneously. Against a group with ranged units, kill those first; they'll chip your health from range while you're occupied with melee threats.
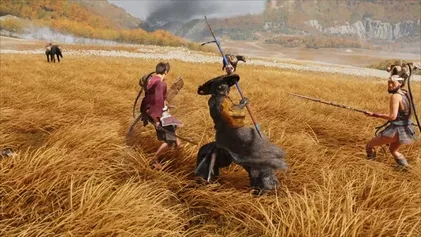 Image credit: Sucker Punch Productions / Sony Interactive Entertainment (official screenshot, via Wikipedia) - verify rights before publication
Win Standoffs by watching the feet, not the shoulders
Standoffs — the tense duel-opener mechanic returning from Tsushima's lineage — let you drop multiple enemies instantly with correct timing, and certain gear extends how many you can eliminate in a single Standoff. But on higher difficulties, failing the timing window kills you outright instead of just costing a health chunk, so precision actually matters here more than in the previous game.
The tip that separates clean Standoff wins from panicked mashing: don't watch the opponent's upper body for a feint. Focus on their rear foot. The moment it shifts to initiate their strike, that's your genuine tell — react to that, not to shoulder or sword movement, which can be faked.
Learn the glint colors before you learn anything else
Two visual cues govern almost every dangerous attack in the game, and misreading them is the single biggest cause of unnecessary deaths:
- Red glint — unblockable and unparryable. You must dodge or jump over it. Blocking or parrying a red attack does nothing but eat damage.
- Blue glint — parryable, but cannot be blocked outright. This is your cue to time a parry rather than hold guard.
Staggered enemies take significantly increased damage, and staggers come from parries, Quickfire tool use, and certain weapon attacks — so a clean parry isn't just defense, it's your best damage window.
Combat checklist
- Identify enemy weapon types before engaging and switch to the counter weapon when possible.
- In Standoffs, track the rear foot for the real attack tell, not the torso.
- Red glint = dodge/jump only. Blue glint = parry only. Never block either.
- Kill ranged enemies first in mixed encounters, then clean up melee.
Yotei's combat rewards preparation over reaction speed alone — knowing which of your five weapons wins a given matchup before the blades are even drawn is what separates a clean duel from a desperate scramble.
Sources:

Jordan writes the guides that get you unstuck — build orders, boss patterns, and progression routes tested step by step before publishing. A former competitive player turned full-time guide writer, Jordan has a soft spot for punishing difficulty settings and a spreadsheet for every game with a skill tree. Readers trust the guides because Jordan actually finishes them first.


Comments
No comments yet — be the first to share your thoughts.